
Commander: Artanis
Hierarch of the Daelaam
Sections on this Page
Commander Summary
Artanis' army features the basic staples of any Protoss army, including Zealots and Immortals. However, combined with the Spear of Adun, his army can be resilient and powerful.
Progression & Talents
Level Unlocks
| Level/Icon | Name | Description |
|---|---|---|
 |
Swift Retribution | Artanis warps units into the battlefield almost instantly. |
 |
Guardian Shell | Upon taking fatal damage, friendly units become invulnerable for a short time, escaping death and restoring 15% life and shields. The same unit cannot be shielded again for 4 minutes. |
 |
Superior Warp Gates | Increases the number of charges on Warp Gates from 1 to 3. |
 |
Twilight Council Upgrade Cache |
Unlocks the following upgrades at the Twilight Council:
|
 |
New Unit: Reaver |
Area-damage siege unit. Shoots scarabs for high burst damage. Warped in at the Robotics Facility. Can attack ground units. |
 |
Templar Archives Upgrade Cache |
Unlocks the following upgrade at the Templar Archives:
|
 |
High Archon | Unlocks the ability for Archons to use the Feedback and Psionic Storm abilities. |
 |
Spear of Adun: Warp Harmonization |
Stargates and Robotics Facilities can warp in units at any location with pylon power. Passive ability. |
 |
Reaver Upgrades Pack |
Unlocks the following upgrades at the Robotics Bay:
|
 |
Spear of Adun: Solar Bombardment | Unlocks the ability for the Spear of Adun to randomly bombard an area for massive damage over 15 seconds. Activate Solar Bombardment from the top panel. |
 |
New Unit: Tempest |
Siege artillery craft. Attacks from long range. Warped in at the Stargate. Can attack ground and air units. |
 |
Fleet Beacon Upgrade Cache |
Unlocks the following upgrades at the Fleet Beacon:
|
 |
Spear of Adun: Shield Overcharge | Increases the amount of damage absorbed by the Spear of Adun's Shield Overcharge ability from 100 to 200. Activate Shield Overcharge from the top panel. |
 |
Spear of Adun: Solar Onslaught | Increases the number of shots fired during the Spear of Adun's Solar Bombardment ability from 200 to 400. Activate Solar Bombardment from the top panel. |
 |
Glory of the Daelaam | Increases starting supply to 200. |
Highlighted rows denote large power spikes for the commander.
Masteries
Below are the three Power Sets for Artanis with the recommended point allocations for each. Note that these are meant to serve a general, all-purpose build that is effective across all maps with no Prestiges selected. You are highly encourged to change these masteries to suit your playstyle and particular challenges you face (e.g. Weekly Mutations).
Power Set 1:
| Power | Value | Recommended Points to Add | Further Considerations |
|---|---|---|---|
| Shield Overcharge Duration and Damage Absorption | 3% per point 90% maximum |
30 | In particular scenarios, where engagements last a longer time, with stronger enemy forces, the Shield Overcharge mastery might serve players better as it prevents the player's units from taking damage. |
| Guardian Shell Life and Shield Regeneration | 0.5% per point 15% maximum |
0 |
The difference in the amount of HP gained between no points and maximum points in the Guardian Shell is relatively insignificant. On higher difficulties, it means units will still be lost, regardless. It is best to prevent damage to the units entirely, making the Shield Overcharge mastery better.
Power Set 2:
| Power | Value | Recommended Points to Add | Further Considerations |
|---|---|---|---|
| Energy Regeneration and Cooldown Reduction | 1.5% per point 45% maximum |
? | The choice here mostly depends on the type of units that the player prefers to use. The Energy Regeneration mastery can help improve the effectiveness of Archons and High Templars, especially when dealing with Zerg compositions. Cooldown reduction affects cooldowns like Reaver Scarab creation, Zealot Charge and other time-based abilities. The speed increase buff lasts for 30 seconds. |
| Speed Increase for Warped in Units | 2% per point 60% maximum |
? |
If you use a lot of Archons in your build, or rely on unit abilities like Zealot Charge or Reavers, you may want to consider having the Energy Regeneration mastery. Otherwise, the Speed Increase is beneficial.
Power Set 3:
| Power | Value | Recommended Points to Add | Further Considerations |
|---|---|---|---|
| Chrono Boost Efficiency | 1% per point 30% maximum |
30 | The Spear of Adun mastery can be useful for players that prefer to spam its abilities often. For example, those with hyper-aggressive playstyles can utilize this energy to its maximum extent. |
| Initial and Maximum Spear of Adun Energy | 3 per point 90 maximum |
0 |
In general circumstances, the Spear of Adun Energy mastery isn't beneficial if you play efficiently because you won't be able to use the energy in the early game.
Prestiges
Below are the prestiges for Artanis. Note that "Effective Level" is the level at which the prestige achieves it full effect.
| P1: Valorous Inspirator | |
| Advantages |
|
|---|---|
| Disadvantages |
|
| Notes |
|
| Effective Level | 1 |
| Advice | This prestige provides an all-round improvement to Artanis' units. For example, it increases the damage dealt by High Templar Psi Storms and reduces the construction time of Reaver scarabs. This opens up a lot of avenues for playstyle changes. However, Dragoons are unaffected and Tempests receive minimal improvements. The higher cost of units makes it slower to ramp up and more punishing of unit losses. This Prestige works well with the Energy Regeneration and Cooldown Reduction mastery. |
Effectiveness Bonuses:
- Zealot Charge Speed doubled
- Zealot Whirlwind Damage doubled
- High Templar/Archon Feedback Damage doubled
- High Templar/Archon Psionic Storm Damage doubled
- High Templar/Archon Psionic Storm Shield Recharging rate doubled
- Archon Merge Time halved
- Immortal Barrier Damage Absorption doubled (upgrade included)
- Reaver Scarab Build Time Halved
- Phoenix Graviton Beam Cooldown Halved
- Tempest Disintegration Damage doubled
| P2: Nexus Legate | |
| Advantages |
|
|---|---|
| Disadvantages |
|
| Notes |
|
| Effective Level | 1 |
| Advice | This prestige changes how Power Field is used. Instead of letting you reinforce your army in combat, it's a mobility tool. The high cost of the Power Field (25 energy) makes the prestige quite energy starved, so energy management is crucial. This prestige compounds well with the "Speed Increase for Warped Units" mastery, since every time units are moved using the Power Field, they get the buff. |
| P3: Arkship Commandant | |
| Advantages |
|
|---|---|
| Disadvantages |
|
| Notes |
|
| Effective Level | 1 |
| Advice | This prestige gives Artanis much more powerful calldowns at a high cost: The loss of Guardian Shell, which increases the fragility of Artanis' already-fragile army. The Unbound Fanatics that spawn from the Orbital Strikes have strong splash damage, similar to Karax's Solar Lances. It also allows Artanis to fast-expand on maps (a single set of Orbital Strikes can easily clear contested expansions). In addition, Shield Overcharge can be used twice as often, which partially offsets the loss of Guardian Shell, and if armies are bunched up, it is still possible to cover both armies. |
For general play, P3 (Arkship Commandant), P2 (Nexus Legate), and P0 (no prestige, Hierarch of the Daelaam) have their place. P3 (Arkship Commandant) is arguably strongest and most flexible, but it lacks Artanis's signature ability. P2 (Nexus Legate) is strong but requires careful Spear of Adun energy management. P1 (Valorous Inspirator) ramps slowly. P0 (no prestige, Hierarch of the Daelaam) has easy reinforcement but lack mobility.
Abilities & Units
Calldowns
The calldowns for Artanis, at level 15, with no mastery points added are:
| Calldown | Costs | Advice |
|---|---|---|
|
Cooldown: |
|
|
Cooldown: Energy Required: |
|
|
Cooldown: Energy Required: |
|
|
Cooldown: |
|
 Project Power Field
 Orbital Strike
 Shield Overcharge
 Solar Bombardment
Combat Units
For more information on Artanis' unit stats, comparison between units and upgrade calculations, visit the Data Tables page.
Artanis's combat units are listed below:
- They are the most basic unit in Artanis' army.
- Realtively fragile, so not particularly useful when massed.
- They should make up a small part of your army to tank for more expensive units.
- Reasonably good when dealing with large amounts of low-HP units when they have Whirlwind.
Skills:
| Skill | Name | Description | Cooldown | Energy Cost |
|---|---|---|---|---|
 |
Charge | Intercepts enemy ground units and increases movement speed. | 10 seconds | 0 |
 |
Whirlwind | Deals 10 damage per second to all nearby enemy units. Lasts 3 seconds. | 10 seconds | 0 |
Upgrades:
| Upgrade | Name | Effect |  / / |
Research Time |
|---|---|---|---|---|
 |
Charge | Allows Zealots to intercept nearby enemies. Also increases the movement speed of Zealots by 0.25. | 100/100 | 60 seconds |
 |
Whirlwind | Enables Zealots to use the Whirlwind ability. Whirlwind damages all nearby enemy units while active. | 150/150 | 90 seconds |
- Useful when dealing with armored targets.
- Good anti-air capabilities makes them a good choice against Air Terran.
Skills: None
Upgrades:
| Upgrade | Name | Effect | / |
Research Time |
|---|---|---|---|---|
 |
Singularity Charge | Increases the Dragoon's attack range by 2. | 100/100 | 60 seconds |
 |
Trillic Compression Systems | Dragoons gain +20 life and their shield regeneration rate is doubled. Also allows the Dragoon to regenerate shields in combat. | 150/150 | 90 seconds |

- Powerful Psionic unit.
- Psionic Storm is a great ability to use when dealing with Zerg and Infested compositions.
- Feedback can 1-shot Phoenixes, Sentries and render BattleCruisers and Hybrid Dominators useless.
- Draws high aggro, so they should be kept at the back of your army.
Skills:
| Skill | Name | Description | Cooldown | Energy Cost |
|---|---|---|---|---|
 |
Feedback | Drains all energy from the target. Deals 1 damage per point of energy. | 0 seconds | 50 |
 |
Psionic Storm | Creates a storm of psionic energy that lasts 4 seconds, causing up to 80 damage to all enemy units in the target area. Does not damage friendly units. | 2s | 75 |
Upgrades:
| Upgrade | Name | Effect | / |
Research Time |
|---|---|---|---|---|
 |
Psionic Storm | Allows High Templar and Archons to summon a storm of psionic energy, causing heavy damage to all enemy units in the target area. | 100/100 | 60 seconds |
 |
Khaydarin Amulet | Increases the starting energy of High Templar and Archons by 150. | 100/100 | 60 seconds |
 |
Plasma Surge | The High Templar's Psionic Storm's radius is increased by 50%, range increased by 2, and restores 50 shields to friendly units in the target area. | 150/150 | 90 seconds |

- Merged from two High Templars.
- Psionic Storm is a great ability to use when dealing with Zerg and Infested compositions.
- Feedback can 1-shot Phoenixes, Sentries and render BattleCruisers and Hybrid Dominators useless.
- Splash damage is useful when dealing with Zerg and Infested compositions.
- Bonus damage to Biological targets makes them a great pick for Infested maps.
Skills:
| Skill | Name | Description | Cooldown | Energy Cost |
|---|---|---|---|---|
|
Feedback | Drains all energy from the target. Deals 1 damage per point of energy. | 0 seconds | 50 |
|
Psionic Storm | Creates a storm of psionic energy that lasts 4 seconds, causing up to 80 damage to all enemy units in the target area. Does not damage friendly units. | 2s | 75 |
Upgrades:
| Upgrade | Name | Effect | / |
Research Time |
|---|---|---|---|---|
|
Psionic Storm | Allows High Templar and Archons to summon a storm of psionic energy, causing heavy damage to all enemy units in the target area. | 100/100 | 60 seconds |
|
Khaydarin Amulet | Increases the starting energy of High Templar and Archons by 150. | 100/100 | 60 seconds |
|
Plasma Surge | The High Templar's Psionic Storm's radius is increased by 50%, range increased by 2, and restores 50 shields to friendly units in the target area. | 150/150 | 90 seconds |
- Provides extremely powerful single-target DPS.
- Great for destroying structures and other high-HP objectives
Skills:
| Skill | Name | Description | Cooldown | Energy Cost |
|---|---|---|---|---|
 |
Barrier | Absorbs up to 100 damage. Lasts for 10 seconds. | 60 seconds | 0 |
Upgrades:
| Upgrade | Name | Effect | / |
Research Time |
|---|---|---|---|---|
 |
Improved Barrier | Increases the amount of damage absorbed by the Immortal's Barrier by 100%. | 100/100 | 60 seconds |

- Provides high damage, burst, splash damage.
- Relatively ineffective on maps with prolonged combat, as they can run out of scarabs.
- Since scarabs take time to hit their target, several Reavers can fire at the same target, wasting shots.
Skills:
| Skill | Name | Description | Cooldown | Energy Cost |
|---|---|---|---|---|
 |
Create Scarab | Builds Scarabs that automatically launch at the Reaver's target and explode for area damage. Can attack ground units. (5 max). |
8s | 0 |
Upgrades:
| Upgrade | Name | Effect | / |
Research Time |
|---|---|---|---|---|
 |
Scarab Housing | Doubles the maximum number of Scarabs that Reavers can hold. | 100/100 | 60 seconds |
 |
Solarite Payload | Increases the splash damage radius of Scarabs by 25%. | 150/150 | 90 seconds |

- Great unit on defensive maps with ground compositions.
- Its ability to lift can render ground-based attack waves useless.
- Massing them should only be done against the correct compositions, because they are extremely fragile units.
Skills:
| Skill | Name | Description | Cooldown | Energy Cost |
|---|---|---|---|---|
 |
Graviton Beam | Makes the target unit float in the air, disabling its abilities. Effect lasts up to 10 seconds. Massive units are immune. |
30 seconds | 0 |
Upgrades:
| Upgrade | Name | Effect | / |
Research Time |
|---|---|---|---|---|
 |
Anion Pulse-Crystals | Phoenixes gain +2 range. | 100/100 | 60 seconds |
 |
Double Graviton Beam | Allows Phoenixes to cast Graviton Beam on two enemies at once. | 150/150 | 90 seconds |

- Powerful air siege unit that can fire from long range.
- Useful for taking down bonus objectives.
- Disintegration is great for dealing extra damage to objectives, but does not stack on the same unit.
Skills:
| Skill | Name | Description | Cooldown | Energy Cost |
|---|---|---|---|---|
 |
Disintegration | Deals 500 damage over 20 seconds to target enemy unit or structure. | 90 seconds | 0 |
Upgrades:
| Upgrade | Name | Effect | / |
Research Time |
|---|---|---|---|---|
 |
Disintegration | Enables Tempests to deal damage over time to an enemy unit or structure. | 150/150 | 90 seconds |
Guide
Recommended Army Composition
The recommended army composition for Artanis is below. Note that this assumes no Prestige talent selected and recommended Mastery Allocations. This is a basic recommendation for your army framework. It is recommended to gain an understanding for each of the units in the Units section and further add tech units so that you are able to better handle the situations you face.


Dragoons deal good amounts of damage from long range, but are reasonably fragile, which is where Zealots come into play. Warp in Zealots in front of Dragoons so they can tank while Dragoons deal damage.

Add Immortals to your army when dealing with Armored ground targets and to tank for Dragoons.
Sub-Ascension Leveling
Difficulty: Easy
A Dragoon/Zealot build works best while leveling. Focus on mostly Dragoons, and warp in Zealots (with Charge) on the frontline before you take an engagement. This will cause the Zealots to soak up damage away from Dragoons.
Build Order
Below is the standard economic build order for Artanis. For more information on how to read and construct your own build orders, please check the Build Order Theory page.
Project Power Field
15 Gateway
17 Assimilator
18 Assimilator
Chrono Gateway
21 Zealot -> Rocks
24 Zealot
Chrono Nexus
31 Nexus
33 Cybernetics Core
34 Pylon
Playstyle Traps
A common trap for Artanis players is to go for a mass Tempest build. Granted, Tempests are powerful units that can deal a lot of damage. However, it leaves players vulnerable to the early game. A mass Tempest build only works if the other ally is aware of that build, and is able to compensate with a strong early game. Additionally, enemy compositions also come into play. Compositions with a large number of low-HP units make Mass Tempests a difficult build to pull off.
In most co-op maps, a mass Tempest build can be outdone by some combination of Immortals/Zealots/Phoenixes/Archons. However, if a player still chooses to mass Tempests, it is better to start with some early game in the form of Zealots and Dragoons before transitioning to Tempests.
Building the Artosis Pylon
Because Artanis starts at 200 supply, he does not need to build pylons to increase his supply limit. Hence, pylons should only act as a source of power. Even warping in can be done via the "Project Power Field" calldown. Therefore, only one pylon should ever be built for Artanis.
A single pylon can power up to 16 buildings at the same time. This should be more than adequate for most intents and purposes. Such a pylon is shown below:
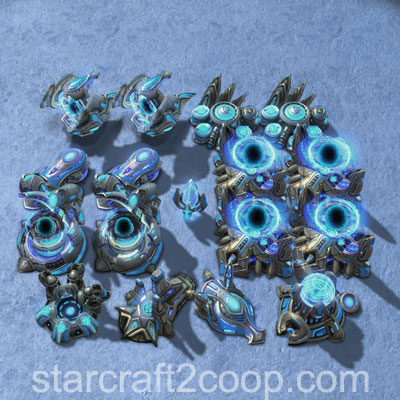
The below is a top-down view of the pylon. The most important thing to notice is how two gateways are set adjacent to the pylon.
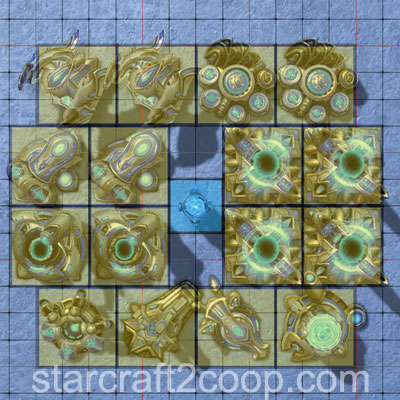
Once those two gateways are positioned, the rest of the positioning is easy as you will build around the pylon.
Playstyle Tips
- Contrary to what some guides say, Solar Bombardment doesn't have a "heat map", ie, some patches which deal more damage than others. Solar Bombardment starts at a radius of 2 from the target area, and expands to a radius of 10 over the duration of the bombardment. Any areas that get hit more than others is purely due to randomness.
- At the start of the game, before you build your Artosis Pylon, build a Gateway on the Warp Field. This will allow you to faster progress through the Tech Tree.
- When you want to make Archons, ensure you have utilized the energy from the two High Templars first. Once the Archon is merged, it's energy will be replenished, allowing you to use the skills again.
- Psi Storms can stack if Plasma Surge has been researched. This is demonstrated in the video below:
- When you want to cast Solar Bombardment, suicide a Zealot to cast it deep into enemy territory.
- While Solar Bombardment is active, Warp in a Zealot and use it to lure enemy units into the bombardment for extra clearing potential.
- The Tempest's Disintegration ability can be cast on multiple train carriages in Part & Parcel and Oblivion Express.
- Use Observers when playing with Tempests to provide vision. Tempests' Disintegration has a higher attack range than their vision range.
- Hold Shift when Orbital Strike is selected and press any key bound to Rapidfire to fire Orbital Strikes without delay in between shots.
Achievements
The commander-specific achievements for Artanis are:
| Achievement | Name | Description |
|---|---|---|
 |
Finger of Death | Kill 50 units with Artanis's Orbital Strike in a single mission on Hard difficulty. |
 |
Sol-alright | Absorb 10,000 damage for your ally with Artanis's Shield Overcharge in Co-op Missions. |
 |
Solar Fury | Kill 50 units with a single strike of Artanis's Solar Bombardment on Hard difficulty. |
 |
Warp Speed | Warp in 5,000 units with Artanis in Co-op Missions. |