
Mission: Mist Opportunities
Belshir
Sections on this Page
Mission Summary
Egon Stetmann, stranded on Bel’shir since before the fall of Arcturus, is now under assault from Amon’s forces. Protect his harvesters as they collect the planet’s terrazine to prevent it from falling into the wrong hands.
Objectives
Primary Objective
- Escort Harvesting Bots (5 Waves)
- Do not let 2 bots be destroyed
Secondary Objective
- Destroy the Extraction Device (2)
Bot Harvesting Order
Change all base analysis pictures to race:
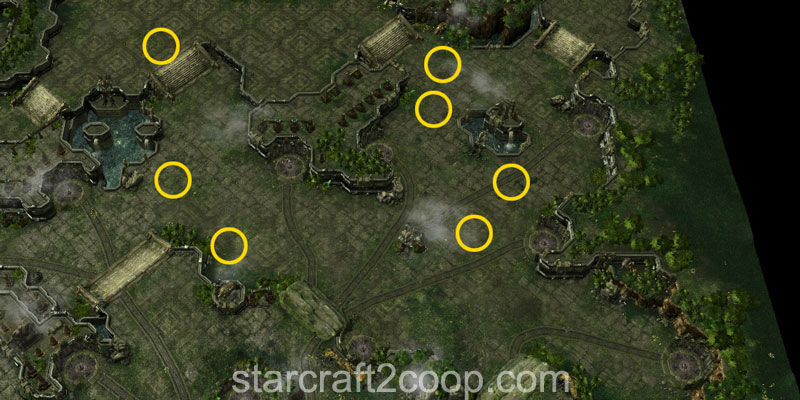
There are a total of five bot waves that will leave the base area to go to harvest Terrazine. The goal of the mission is to protect those bots from enemy attack forces. The number of the bots in the wave increases as the mission progresses. The harvesting locations for each of the waves is shown below.

Each bot takes 60 seconds to harvest the Terrazine. However, do note that there is a travel time to and from the Terrazine Geyser, where the bots can also be attacked by stray forces and attack waves.
Completing the Bonus Objective
The bonus objective requires you to destroy two Terrazine Extraction Devices that are extracting Terrazine from the Belshir Gliders.
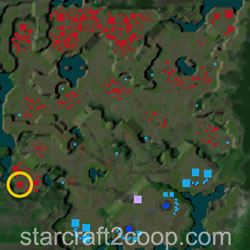
Each extraction device is guarded by a number of enemy forces. The location and guards of the first extraction device is shown below.

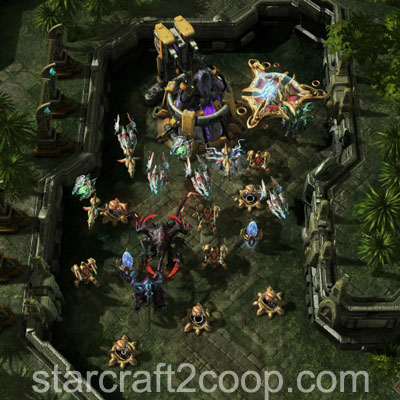
The location and guards of the second extraction device is shown below. These forces are a lot stronger, but are much more clumped up together.

Timings
Note: Information on Tech and Strength levels can be found on the Enemy Compositions page.
There are three timings that play a role in Mist Opportunities. These are:
- Attack Waves: These are waves that target your base.
- Harvester Bots: These are the times when the harvester bots are sent out, making them vulnerable to attack.
- Harass Waves: These are waves specifically targeting the bots to destroy them.
The timings, Strength and Tech levels of attack waves in this mission are listed below.
| Wave | Time | Tech Level | Strength Level |
|---|---|---|---|
| 1 | 3:00 | 1 | 1 |
| 2 | 10:00 | 3 | 3 |
| 3 | 15:30 | 4 | 4 |
| 4 | 21:15 | 5 | 5 |
| 5 | 28:06 | 6 | 6 |
Additionally, attack waves 3 and 5 have Hybrids with them. Both these waves will have 2 Minor and 1 Major Hybrid. The types of these Hybrids will depend on the enemy race, as follows:
| Race | Minor Hybrid | Major Hybrid |
|---|---|---|
| Protoss | Hybrid Destroyer | Hybrid Behemoth |
| Terran | Hybrid Reaver | Hybrid Dominator |
| Zerg | Hybrid Nemesis | Hybrid Dominator |
Harvester Bot waves will give you a warning before the bot leaves. It then takes 45 seconds for the bot to actually spawn at the station. 20 seconds later, it will leave to harvest the Terrazine. The timings are all summarized below.
| Bot Wave | Warning Time | Spawn Time | Leave Time |
|---|---|---|---|
| 1 | 3:30 | 4:15 | 4:35 |
| 2 | 6:45 | 7:30 | 7:55 |
| 3 | 11:00 | 11:45 | 12:10 |
| 4 | 17:00 | 17:45 | 18:20 |
| 5 | 23:40 | 24:25 | 25:00 |
Harass waves will start to spawn and target the harvesting bots. The timings for the harrass waves for each bot wave is below.
Bot Wave 1:
| Wave | Time | Tech Level | Strength Level |
|---|---|---|---|
| 1 | 5:00 | 1 | 1 |
| 2 | 5:25 | 1 | 1 |
Bot Wave 2:
| Wave | Time | Tech Level | Strength Level |
|---|---|---|---|
| 1 | 8:15 | 2 | 3 |
| 2 | 8:40 | 2 | 3 |
| 3 | 9:05 | 2 | 3 |
| 4 | 9:30 | 4 | 4 |
Bot Wave 3:
| Wave | Time | Tech Level | Strength Level |
|---|---|---|---|
| 1 | 12:25 | 3 | 3 |
| 2 | 12:50 | 3 | 3 |
| 3 | 13:15 | 3 | 3 |
| 4 | 13:40 | 3 | 3 |
| 5 | 14:00 | 3 | 3 |
| 6 | 14:25 | 3 | 3 |
Bot Wave 4:
| Wave | Time | Tech Level | Strength Level |
|---|---|---|---|
| 1 | 18:40 | 4 | 4 |
| 2 | 19:15 | 4 | 4 |
| 3 | 19:50 | 4 | 4 |
| 4 | 19:55 | 4 | 4 |
| 5 | 20:25 | 4 | 4 |
| 6 | 21:00 | 4 | 4 |
Note: If the first or fourth wave spawn from the bottom left, that wave and all subsequent waves will have a Tech Level of 1.
Bot Wave 5:
| Wave | Time | Tech Level | Strength Level |
|---|---|---|---|
| 1 | 25:10 | 4 | 4 |
| 2 | 25:30 | 4 | 4 |
| 3 | 25:50 | 4 | 4 |
| 4 | 26:05 | 4 | 4 |
| 5 | 26:25 | 5 | 5 |
| 6 | 27:00 | 5 | 5 |
| 7 | 27:35 | 5 | 5 |
| 8 | 28:10 | 5 | 5 |
| 9 | 28:45 | 5 | 5 |
Spawn Points
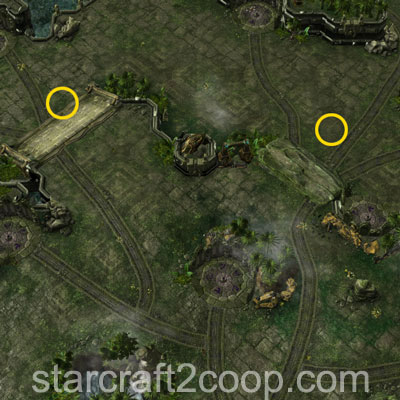
Attack Waves have two spawn points on the map. These are shown below.

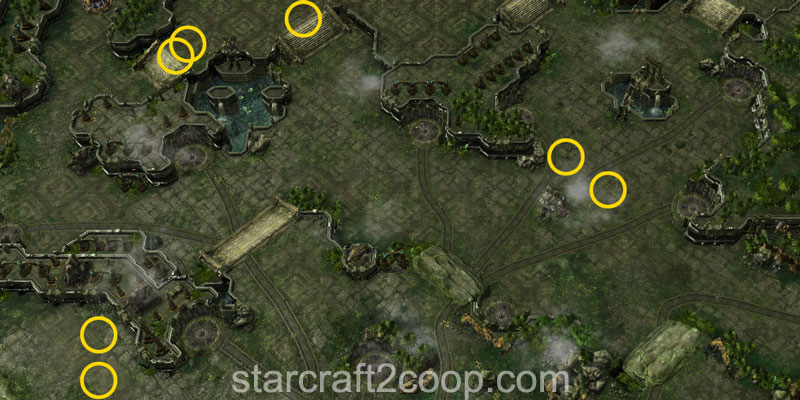
Escort Wave spawn positions are much more complicated. There are multiple different spawn positions in the same area. The logic behind this is that spawn positions farther away from the bots will be used at the start of the harass waves. As the bots continue to harvest Terrazine, closer spawn positions will be used. The possible spawn positions for harass waves for each bot wave is shown below.
Bot Wave 1:
Bot Wave 2:

Bot Wave 3:
Bot Wave 4:
Bot Wave 5:

Mission Tips
- Clear harvest locations ahead of time to ensure bots do not take damage.
- The bonus objective countdown will stop as long as the bonus objective is being hit. This means a single photon canon or army unit can stop the countdown. Use that to take out the bonus objective after you have cleared the area.
Commander-specific Tips
- Abathur: Place Toxic Nests on key choke points to weaken attack and harass waves.
- Han & Horner: Place Mag Mines on key choke points to weaken attack and harass waves.
- Karax: Build static defenses near key choke points to take out harass waves.
- Kerrigan: Omega Worms can give you great mobility to defend multiple bots in quick succession.
- Nova: If you use Siege Tanks, place Spider Mines on key choke points to weaken attack and harass waves.
- Raynor: If you use Vultures, place Spider Mines on key choke points to weaken attack and harass waves.
- Vorazun: Place Dark Pylons and use their Recall to move your army around the map.
- Zeratul: Void Arrays can give you great mobility to defend multiple bots in quick succession.